I did find one at Z Gallery and the price wasn't even that bad for there...$160. So, after thinking about it for a few days, I went back to buy it, only to find out that it was on back order...till APRIL? Seriously, how is something on back order 4 months...of course I COULD go ahead and pay for it and wait till it comes in...yeah, I don't think so!
So, the hunt continued. Until a few weeks ago when Kelli sent me a picture from Pinterest. It was a clock made from a pallet...why does everything cool have to made from a pallet. You used to see these things everywhere...now they have become so popular, good ones are hard to find. So what does a girl do? What any guy would do...I decided to build it. Nope, not the pallet...the clock!
I can't find the original image, but it was similar to this:
 |
| Via Pinterest |
It is the same wood that I used for my centerpiece boxes. It is like $2 a piece for the wider planks and $1.50 for the skinnier pieces. I needed three wide, one skinny.
I needed a good size clock, so I cut each wide piece about 33 inches long, and used six pieces in all. I gave them a very QUICK sanding with a palm sander and laid them side by side on the garage floor.
I cut the skinnier pieces to go the opposite direction, crossing all the wide boards. Clear as mud? I know...I am horrible about taking "in progress" pics. It is because I am so anxious to complete a project, I never even think about it. My daughter sees this as a definite character flaw!
Anyhoo, I screwed all the way down...two screws to each wide board to hold it together well. A tip...these boards tend to be a little "wet"...make sure they dry completely before putting your clock together. When you see the pic, you will notice I have a slight "gap" where the two boards dried more after assembly...I like to think it adds more vintage "charm" (wink, wink)!
Flipped it over and Voila! I used Minwax "Special Walnut" stain, which was the same color I used for Kelli's Farmhouse Table. Love this color stain!
Next it was time to add the clock face. I had purchased one from my favorite ETSY seller, Graphique, a long time ago for another project. I printed it out on regular paper, and headed to what used to be, Kinko's, to have it blown up to size.
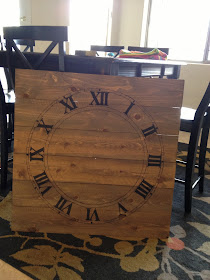
Using graphite paper, I transferred the image onto the wood. Here is where I have a hint for you! In the past I have used a Sharpie to "paint" my image on (I am much too impatient to use a brush and paint)...but sometimes I find that they "bleed" a little so this time I decided to use one of my beloved Copic Markers:
I have a huge set of these pens left from my paper crafting days...I have never been able to part with them. They are irreplaceable really, because I am not going to lie...they cost a fortune! See those tips on the bottom? They are almost like a paintbrush...the ink flows out like buttah! Perfect for fine detailing and NO bleeding! And don't panic...you can buy these individually at Micheals or Hob Lob! It is an awesome permanent marker...well worth the $$ for a project like this!
It got me to here:
I decided it was a little too plain for my liking, so I decided to add another vintage image from Graphique...the same one that I used on this headboard.
I ended up having to purchase my clock hands from Klock-it. Their prices were cheaper than most, but of course they get you with shipping costs...all in all still not bad.
Here is what my clock looks like hanging above my mantle:
A closer view:
Whatcha' think?
Cost breakdown:
Boards- $7.50
Wood Screws $2
Stain- Nothing since it was already in my stash
Wipe on Poly- Also, in my stash
Images- Originally $1 each
Clock face enlargement $5
Clock Hands/Motor- about $20,with shipping!
Total cost: Approximately, $36
Not bad...cheap and easy...in fact, one of the easiest projects yet!
This post linked to:
My Repurposed Life
Miss Mustard Seed
House of Hepworth


I love your new clock Terri. you did a fabulous job making it
ReplyDeleteway to go girl!
gail
Freakin' amazing, missy!! I love, love, love it! And I love that you used your Copics . . . maybe that means you'll soon be using your stamps, too?! LOL Can't wait for tomorrow - where are we going to lunch?! LMAO
ReplyDeleteWOW! I love it the clock.
ReplyDeleteI love this! Pinning!
ReplyDeleteJenny from diywithjenandb.blogspot.com
New here! Awesome clock, pinned!
ReplyDeleteWow,that looks amazing! I've never heard of Copics. I do a lot of graphics, especially clock faces so I'll have to give them a try. Thanks for sharing, Dee from My Painted Stuff.
ReplyDelete