10.31.2013

Happy Halloween!

It's finally here...and I have to say that I am ready! 

Okay, that is not the truth...this morning while laying in bed at some ungodly hour, I decided that I needed to make some little Halloween treats for the little goblins next door  I just happen to have a half batch of cookie dough in the fridge, just waiting to be used up.  Lucky for me, I also have some icing made as well.  Believe it or not, I even picked up a couple new Halloween cookie cutters yesterday that I definitely didn't need, but now I don't have to wait till next year to use them!

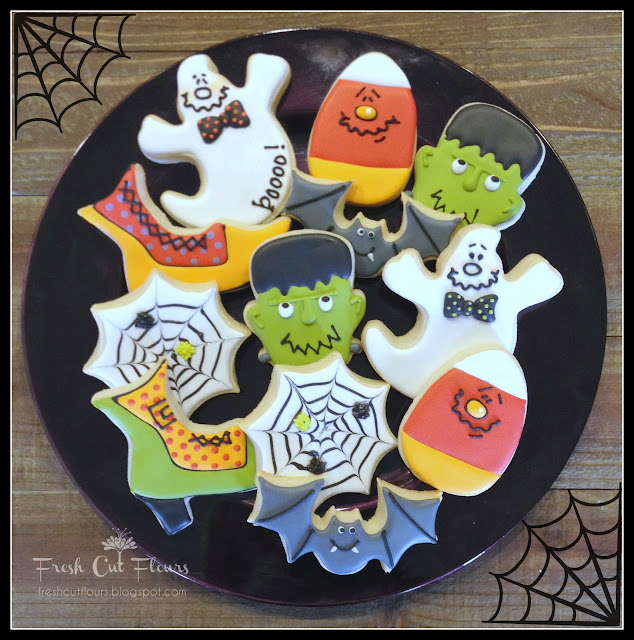
In the meantime, here are the last of the Halloween cookies that I DO have made.

Kelli's work Halloween party was also a "football" theme.  Thanks to my friend Lisa, from the "The Bearfoot Baker", I was able to incorporate the two!  She was the one that came up with the idea to put Halloween characters on any ol' shape cutter.  You can see her adorable cookies here, and here.  Of course I used a football cutter and of course if I had it to do over, I would do it differently...but here they are anyway:


What would I do different, you ask...well, I would have also added the football detailing (you know the white part, whatever that is called)!  Duh...why do you always think of these things too late.  Anyhoo, what's done is done!

I also made this platter for Shannon to serve while carving pumpkins:


And last (or what I thought was last), these that Corie ordered to give to the teachers:


Thanks to all that ordered Halloween cookies this year!

Hope everyone has a safe and Happy Halloween!


Photobucket

10.28.2013

More Halloween...

Sooooo, at this stage of the game, even I am on Halloween overload....but knowing that it will all be over in four days, I manage!  There are enough different Halloween designs that I really don't get that tired of making them, but I won't miss seeing green, orange, black and purple icings on my counter top!

Here are a few from last week.  These were sent to Denver for Melissa's Halloween party:


Kelli's co-worker, Bernetta, ordered both of these plates:


Aren't those pumpkins a hoot!  I made some of these last year but they still make me smile every time that I look at them.  Thanks again for Sarah at Klickitat Street for sharing her cute face templates!

That's all that I have for today, but I will have a few more sets in the next couple of days.  Going outside my comfort zone on some, so wish me luck!

Till then...happy baking!


Photobucket

10.24.2013

Tired of Halloween cookies yet?

Then you might want to just skip this post...and few more in the next coming days!  Not only have I been working on orders, I find time to just "play" with a few ideas too!

Remember my "witches feet" obsession...it lives on.  I did a Google search for Witches feet (seriously, how did we ever live without Google) and found this cute little clipart, printed it out and used my KK to draw it on my cookie...easy peasy!


Whatcha' think...can you look at these and not smile?

While I was playing around, I gave SweetSugarBelle's stenciling method a try.  It's a work in progress, but I think once I get the hang of it, I am going to like it!  Speaking of stenciling...if you are wondering why that first cookie appears "blue", which is really NOT a Halloween color, I will tell you that it is supposed to be lavender.  I stirred and shook that little bottle of airbrush sheen (no worries, totally edible) FOR-EV-ER and it never did come out the right color!

Till next time...when I will have even more Halloween to share...


Photobucket

10.22.2013

What I've been up to...

I thought I would share a few cookies that I have made in the last week.

I had an order for fireman cookies from one of Kelli's co-workers:


Thanks, Bernetta!!

Baby Shower cookies:


Thanks, Vanessa!!

And because I KNOW that you could not possibly be tired of seeing Halloween cookies...how about these:


Besides my love of Halloween, I also have a love for witches feet...weird, I know!  These cookies were just for "fun"...I got a vision in my head and ran with it.  The cookie is a combination cauldron and a onsie.

I have lots more Halloween cookies in the making, so be prepared!

Till then...Happy Baking!

Photobucket

10.17.2013

One more day...

to enjoy the company of my kids.  It has been a whirlwind...how did that week pass by so quickly?!  They have been going almost nonstop...you know what it is like when you "go home" to visit!

We are making the most of our last night, when we all (except sadly, Melissa and Tatum) go to the Cardinals/Seahawks game.  It will be quite the family rivalry since Kelli, Ron and I are the Cardinals fans and Tom, Thomas and Taylor will be rooting for the Seahawks.  GO CARDS!!

Now for a few cookies!!

Since we all know that Halloween is getting close, I thought I better share a few more cookies that I recently made.  You know I never get tired of making Halloween cookies and I actually made these at the same time that I did the owls that I posted a few days ago.

I could not resist this cute little bat cutter that I found at Target.  I probably have at least five bat cookie cutters but this one is a little different...love how his wings go up.


Whatcha' think...stinkin' cute little guy, right?

I still have a few more orders for Halloween, so this will not be the last that you see!

Till next time!


Photobucket

10.14.2013

It's almost Hoooooo-loween!

And what better way to get ready than some cute little owls.  This is one of my latest cutters that I purchased from Klickitat Street.  Not only is Sarah a talented cookie decorator, she has recently started making her own cutters.  I couldn't resist (duh!) and I had to purchase all four of her first ones.  I mean, who doesn't need more cutters, right?!

I do have other owl cutters, but I love this one because it is the perfect size.  I couldn't wait to use it, so I decided on some little Halloween owls.  This is what I came up with:


I see myself finding excuses to use this little cutter a lot...love it!

I also can't wait to try the other designs that I got...the little gnomes are adorable and of course the toadstool was a must as well...never know when you will need some of those as well!

I was even bored enough last week to whip up some "minis".  Now, I will be the first to admit that typically minis are not not. my. thing.  Period.  They are super cute, but they seem to be almost as much work as a regular size cookie, but you have a lot less to show for your efforts.

These however, just might be an exception!

I had purchased some clear, plastic containers from Pick Your Plum.  I have to admit that their "daily deals" are a weakness of mine! You may or may not want to purchase some inexpensive chevron infinity scarves in every color, just because they were such a good deal...just sayin'!

Anyhoo, after I decorated the minis they looked like this:


I then bagged them up and heat sealed them:


Put them in one of the cute little 4 x 4 boxes and tied it with a simple tulle bow, added a little Halloween tag that I made using my Silhouette and VOILA!


Whatcha' think?  Wouldn't this be a fun way to get "boooooooo-d" for Halloween?!

Today I will be working on some "coloring book" cookies.  Taylor asked if I would make her some Halloween ones that they could decorate while staying at Nana's house.  How can you say no to that?! 

Til next time!


Photobucket

10.11.2013

Happy Friday!

I am going to make this sort of quick today...I am expecting company and I still have a few last minute things to get done before they arrive.  But this is not just ANY company...this is my babies coming back to AZ for the first time since moving to Colorado a few months ago.  By the end of the day, it won't be so quiet around here...I can't wait!

Anyhoo, I thought I would share a few cookies that I recently did.  I have to say that although these are not necessarily just a "Halloween" cookie, they still remind me of such.  I also have to admit that I was slightly outside my comfort zone when doing these.  Small piping detail is one of my weaknesses, but I decided to push the envelope and give it a try.  After all, you can't get any better if you don't practice, right?

I believe, and any other cookier's that happen to stop by can correct me if I am wrong, but I think a lot of the success of doing fine detailing is the consistency of your icing.  Too thick and it will not flow out easily...this causes problems also because it will crumble off the cookie easily once it is dry.  If you get it too runny, it will not hold it's shape well and it will spread... and you will lose all those fine details you were trying to create.

Still with me?

Good!

So when Marilyn, of Montreal Confections, posted a tutorial on an "easier" way to make "Day of the Dead" cookies, I decided to give it a go.  Marilyn puts together AMAZING tutorials, and she is kind enough (like so many other great cookiers) to share her knowledge to anyone that wants to take the time to learn something new.

These are the cookies that I came up with:


They are far from perfect and if I am being honest, they probably look a little better in the picture than they actually are, but I didn't think they were too bad for the first time.  I have to say...these were sort of addicting.  The possibilities are endless and once you start your detailing, it is kind of hard to stop.


Whatcha' think?  Not too bad for the first time?

I have been busy making several different Halloween cookies to share with you throughout the next week while my kids are here, so be sure to stop back by!

Till then...   


Photobucket

10.09.2013

A LONG time coming!

Before we get too far, I will apologize in advance for the poor "staging" pictures Kelli's dresser.  I took the photos with my Iphone, in my garage...it doesn't get much worse than that.  However, it probably won't get moved until this weekend so, if I wanted to share pics sooner than later, it had to be!

My blog post title pretty much says it all.  This transformation has taken about a year and a half (at least) and should have been done in a weekend, TOPS.  But coulda, shoulda, woulda...it's all water under the bridge now!

I showed you the original dresser that I picked up at an estate sale for $65:


A smokin' deal!  We never had any intentions of leaving it in it's original state although over all, it was in good shape.

Then, if you remember, we thought it would be a good idea to silverleaf (hmmm...is that one work or two?) it.


Not. So. Much!

Now, this might have worked if you were talking about two very patient people trying to make it happen...but this was a little too tedious for me and Kelli has even less patience than I do!  So there it sat for a year while we tried to plan our next move.

Fast forward to a couple of weeks ago.  I ended up stripping/sanding the entire piece to get it to this stage:


And yes, the drawers too!


I went to Home Depot and looked at various strippers and decided that "Klean Strip" sounded like the way to go.


It was tedious to say the least.  I had to go through the silverleaf, the glue that was used to apply it AND the original stain.  I took as much off as possible with this, then sanded the rest.  It took a lot of sweat equity to get it prepared to start over.

Obviously, since silverleaf was what we used originally, you have figured out that we were looking for a "bling" look.  Paint seemed like the only other option, so after giving the dresser a coat of Rustoleum's Gray Primer, I opted to give Martha's paint a try:


The color I used was "Polished Silver".  Let me tell you about this paint.  It's relatively cheap (about $5.50 for this small jar) it goes on beautifully and it also goes a long way...you know there is a "but" coming, right?

BUT, if you are OCD about brush strokes, you may want to rethink this paint!  I thought I could get by it...turns out, I couldn't.  After painting the entire piece with a brush...I decided that I just couldn't let it go.  So, I went over the entire piece using my spray gun....ahhhhhh, much better.  Had I done it this way to begin with...I would have been done last week AND it would have only taken about two of these containers (thinned slightly) to do the entire dresser!

Still with me?

I won't make you wait any longer, I'm sure you didn't come by to hear me ramble all day...you are thinking, get on with it!

This is how she looks all done:


And because sometimes it's not just all about what you are wearing on the outside, I decided to line the drawers with this cool wrapping paper that I picked up at Home Goods:


So, there you have it!  Whatcha' think?

My thoughts?  Well, I would definitely use this paint again, and if you don't have an aversion to brush strokes, just paint it on with a brush!  If you do...save yourself the time and money and just spray it on the first time!

There is a mirror that goes with and yes, it will get done!  When it is, I will take a picture with the entire piece sitting in Kelli's bedroom!

And because you have been so patient...one more peek:


This post linked to:

My Repurposed Life


Till next time...


Photobucket

10.08.2013

Please hang in there...

one more day!  For those of you that have been waiting patiently to see Kelli's finished dresser, you are going to have to wait another day or so...hopefully only one!

This project has become a thorn in my side, but I am happy to say it is finally done!  Yes, I thought I was done last week, but being the OCD person that I usually am when it comes to projects like this, I just wasn't liking how the paint job looked on the piece, so I went to plan "B"...or was was that plan "c"...there has been so many, I have lost track!  Anyhoo, it is now done, for reals...all I have to do is snap some pics and I will share!

In the meantime, I thought I would share a few cookies that I have done recently.

The first is a set of fireman cookies that I made for one of Kelli's co-workers that just got a job with the Tempe Fire Department.  We did a little giftbox:


And because you know that I cannot resist making some Halloween...I whipped up a few of these:


Have you ever Googled "Halloween tombstone names"...there are a bazillion of them, but I decided to go with Daisey Pusher and Ima Stiph...cracks me up!


I have lots more Halloween to share, but I can't show them to you all in one day...how fun would that be?!

Stay tuned...

Photobucket

10.03.2013

Feeling a little "witchy" today!

If you know me at all, you know that I love Halloween.  I skip the whole "costume" thing (for myself, anyway), but I love to decorate for Halloween almost as much as I do for Christmas.  I would be lying if I didn't say that this year I have lost a little of my "mojo" since my babies moved away!  It's just not as fun if you don't have little ones to appreciate it, however, they are coming for a visit so I will still be doing some decorating.

Now cookies...that's a whole different deal.  I couldn't wait to play around with some dough, so I actually made these a couple of weeks ago, but forced myself to wait till October to post them.  I decided to take my favorite little Ecrandal corset cutters and make some Halloween lingerie...this is what I came up with.


Of course, if you happen to catch my Sweet Talk interview over at Simply Sweets by Honeybee you might have already seen these in my little corset "collage".


But since I hadn't posted them here, I thought it was time to share.  Yes, I guess you could call me "obsessed" with this cutter, but I just can't help myself.


How about you...are you feeling a little wicked yet this year?


Till next time...when I most likely will have Kelli's dresser to share...!

Photobucket

10.01.2013

Let's silver leaf a dresser,

that would be fun...said NO. PERSON. EVER!

But that was the look Kelli was after for the dresser that was going in her bedroom.  She did some research and found that it really wasn't that hard to do.  I knew about 5 minutes into the project, that whoever said this, was full of sh bull!

This was the look she wanted:

 Photo via Internet

This is the piece that we started with:


I picked it up at an estate sale for $65...smokin' deal!  Go ahead, ask me why I didn't purchase the entire set, since it was so cheap.  Because I am an idiot...I have been kicking myself every since!

Anyhoo, I like to call this the "before, before" pic.  I should also tell you that this piece has been sitting in my garage for about a year and a half...at least!  I don't even remember when I bought it, to be exact.  It first "sat" because she wasn't sure what she wanted to do to it...but when she finally decided, we got to work!

She purchased the silver leaf off of Ebay  (which I should add, is not actual silver leaf...it's sort of "faux" because the real stuff is super expensive).  She  bought one package, which I believe was around 100 sheets (?)...you know where I am going with this, right?!  Not enough...not even close!

We couldn't wait to get started...not too bad for the first couple of sheets...maybe this will be easy.  NOT!  It was so long ago, I don't even have any good pictures of our "work in progress", so you will have to take my word that it was quickly turning out to be a hot mess.  At the same time, we ran out of silver leaf.  So that was where the progress stopped, until she got more sheets of silver leaf...which she did.

But you know how it is when you start a project and it isn't turning out like you expected?  You suddenly lose interest?  That was pretty much where we were...we got more silver leaf, but we had already lost our mojo for this dresser.  So there it sat...in my garage.

Still with me?!

Fast forward...about a year.  I think it took that long for Kelli to realize her "dream dresser" was not going to happen...at least NOT with silver leaf.

I couldn't take it any longer...I was tired of looking at this:


And God knows, my husband was tired of moving it out of the way in the garage, so it was time to get to work.  See the items sitting on the top...yep, it was time to strip...and strip...and strip.  See, I didn't have to get the silver leaf  just off the dresser itself, but off of all nine drawers as well!  Oyyyyy!

But I am happy to say...I am done stripping!  It now looks like this:


Can I get some virtual HIGH FIVES?!

I have never been so happy to see raw wood in all my life!  And what about the drawers, you ask?  I am happy to report they are DONE...not just stripped, but done completely!

You will just have to come back to see it done, though!  I plan to have this baby finished by the end of the week, so you shouldn't  have to wait long!  Thank the Lord for "almost" bearable temps (we are finally out of the triple digits), so that I am able to work out in the garage again!

Till then... 


Photobucket

LinkWithin

Related Posts with Thumbnails